| ChartCat - Java Chart Library |
|---|
This tutorial is a quick introduction to ChartCat the "Java
Chart Library". It contains a lot of examples that illustrate the basic
concepts of the architecture. To run the examples, you need a Java 2 runtime environment
(see java.sun.com) and at least the ChartCat Evaluation
Version (see http://www.netcat.li).
The full source code of all examples is located in the /src folder of the
example package, and the /bin folder contains the compiled versions of it.
ChartCat can perfectly be integrated into the Java Printing Library (ReportCat). If you want to print a chart or if you want to define a report with tables and charts, ReportCat is the perfect add-on.
Please refer to the API documentation for a more detailed description of all members of the API. Before you start with the tutorial, have a quick look at the overview document. It gives you an idea of the functionality of ChartCat.
Download Free Evaluation Version
Package Structure
Architecture
The First Example
How to Layout Parts
A Bar Chart Example
Adding Tooltips to a Chart
The Part Collection
Adding 3D Perspective to any Chart
Grids and Scales
Pen and PenBox
How to Tag Charts
Printing Charts
Configuring the Look of a Chart
DataModels
Exporting the Chart as PNG
Iterating Over all Elements of a Chart
Overview of ChartCat
API documentation
Download evaluation version, Pricing,
Purchase
Java Report Printing Library
(ReportCat)
NetCat Inc.
Feedback
li.netcat.chart |
The chart package contains the basic interfaces and classes that define the rough architecture. It contains no discreet implementations. All other packages base on this one. |
li.netcat.chart.data |
The data package contains further data models and adapters that provide data in an appropriate form for example for a legend or a scale. Only advanced users have to deal with this package. |
li.netcat.chart.util |
Contains the building blocks (parts) like graphs, scales, legends and
grids that can be used to compose a chart. By convention, the names of all those parts end
with "Part". This package also contains other utilities that help building custom parts. |
li.netcat.chart.util.elem |
This package contains classes and interfaces that make up the basic elements of a chart. Only advanced users have to deal with this package. |
li.netcat.chart.util.tag |
The tag package contains classes and interfaces that make up the tag concept. It proposes a strategy of how to label a graph and how to mange overlaps of tags. Only advanced users have to deal with this package. |
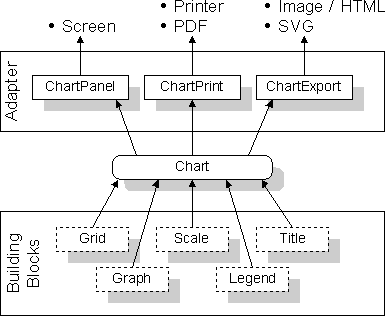
Because charts often need to be painted off-screen (printing, creating
images for the web), ChartCat has a screen independent architecture, which means that it
does not depend on the java.awt.Component. An adapter (ChartPanel to be specific) is used to
display the chart on the screen. Other adapters can be used to direct the chart to another
output channel.
Charts must also be very flexible in its layout and look. Therefore, a "building block" architecture has been chosen. To define a chart, use building blocks like a grid, a graph and/or a scale, plug them together and put them into a chart. The examples of this tutorial will show this process in detail.
The following diagram shows the context of a chart:
The building blocks simply have to implement the Part interface to be a first class citizen. So it is very easy to implement and integrate additional building blocks that can coexist with the existing ones.
Enough theory for the moment. Here comes the first example.
![]() HelloWorldExample
HelloWorldExample
import java.awt.*;
import javax.swing.*;
import li.netcat.chart.*;
import li.netcat.chart.util.*;

public class HelloWorldExample {

  public static void main(String[] args) {
    LabelPart labelPart = new LabelPart("Hello World!");
    labelPart.setAngleDegrees(90);
    open(new ChartPanel(new Chart(labelPart)));
  }

  public static void open(JComponent component) {
    JFrame frame = new JFrame();
    frame.setContentPane(component);
    frame.pack();
    frame.setVisible(true);
    frame.setDefaultCloseOperation(JFrame.EXIT_ON_CLOSE);
    frame.toFront();
  }
}
This code opens the following frame:
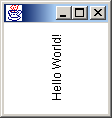
As you can see in the code, a label part has been allocated and
configured. This Part gets packed into a Chart which gets packed into a ChartPanel. Now, we are on the level of a JComponent
which can be displayed on the screen.
Because the architecture of ChartCat is completely independent of Java AWT components, the layout managers of AWT cannot be applied to charts. The layout of charts has anyway another layout paradigm than screen components. Screen components are often layouted alongside whereas the parts of a chart are mostly layouted on top of each other. For that reason, an own layout concept has been developed.
There are only two classes involved in the layout of parts: The PanelPart and the PanelPartConstraints.
As you can guess, the PanelPart
is a counterpart of the java.awt.Container. It is an implementation of
a Part that can contain other parts. In
contrast to AWT, the panel part does not have a pluggable layout manager; the layout
manager is directly built in. The PanelPartConstraints
describe the rules of how to position a part in the panel.
The following example shows, how to layout the parts in a PanelPart. Consider the following arrangement of parts and its rules:
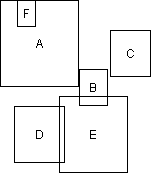
| Part | Horizontal position | Vertical position |
|---|---|---|
| A | somewhere in the universe | somewhere in the universe |
| B | left of B = right of A | center of B = bottom of A |
| C | left of C = right of B + 2 pixel | center of C = center of (A+B) |
| D | center of D = center of A | top of D = bottom of (A+B+C) |
| E | center of E = center of B | center of E = center of D |
| F | center of F = 1/3 between left and right of A | top of F = top of A |
This non trivial example can be layouted using only one PanelPart:
![]() LayoutExample
LayoutExample
public class LayoutExample {

  public static void main(String[] args) {
    FrameHelper.open(createChart());
  }

  public static Chart createChart() {
    PanelPart panel = new PanelPart();
    PanelPartConstraints c = PanelPartConstraints.DEFAULT;
    Part partA = createPart("A", 35);
    Part partB = createPart("B", 10);
    Part partC = createPart("C", 15);
    Part partD = createPart("D", 20);
    Part partE = createPart("E", 30);
    Part partF = createPart("F", 5);
    panel.addPart(partA);
    panel.addPart(partB, c.anchorSouthEast().targetWest());
    panel.addPart(partC, c.anchorEast().targetWest().shiftX(2));
    panel.addPart(partD, c.anchorSouth().targetNorth().referenceX(partA));
    panel.addPart(partE, c.anchorCenter().targetCenter().referenceX(partB).referenceY(partD));
    panel.addPart(partF, c.anchor(1.0f/3.0f, 0.0f).targetNorth().reference(partA));
    return new Chart(panel);
  }

  public static Part createPart(String text, int inset) {
    BorderPart borderPart = new BorderPart(new LabelPart(text));
    borderPart.setInsets(inset, inset, inset, inset);
    return borderPart;
  }
}
Most of the parts know themselves, where to position in the universe. For example a grid and a graph that must lie exactly on top of each other know where to position themselves. Simply avoid the constraints object for this sort of parts.
As you could see in this example, the layout mechanism of one single PanelPart is clearly arranged and very powerful. With the help of boxed panel parts, the most complex layouts are possible.
Since we now know how to layout the parts of a chart, we are ready for the real stuff. Consider the following bar chart and the code that generated this chart:
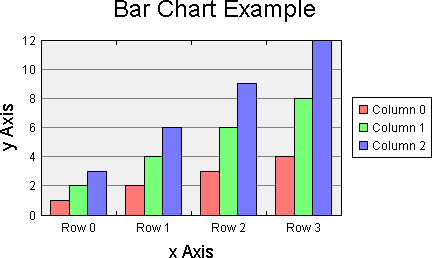
![]() BarChartExample
BarChartExample
public class BarChartExample {

  public static void main(String[] args)	{
    ChartModel model = new SimpleChartModel(4, 3, "Bar Chart Example", "x Axis", "y Axis");
    FrameHelper.open(new BarChart(model));
  }

  public static class BarChart extends Chart {

    public BarChart(ChartModel chartModel) {
      BarPart barPart = new BarPart(chartModel);
      CartesianGridPart grid = new CartesianGridPart(barPart);
      CartesianScalePart scaleX = new CartesianScalePart(barPart, ChartConstants.BOTTOM);
      CartesianScalePart scaleY = new CartesianScalePart(barPart, ChartConstants.LEFT);
      AreaLegendPart legend = new AreaLegendPart(barPart);
      LabelPart title = new LabelPart(chartModel, "title");
      title.setTextLook(TextLook.getDefaultLarge());
      LabelPart xAxis =  new LabelPart(chartModel, "x");
      xAxis.setTextLook(TextLook.getDefaultMedium());
      LabelPart yAxis =  new LabelPart(chartModel, "y");
      yAxis.setTextLook(TextLook.getDefaultMedium());
      yAxis.setAngleDegrees(90);
      PanelPart panel = new PanelPart();
      PanelPartConstraints c = PanelPartConstraints.DEFAULT;
      panel.addPart(grid);
      panel.addPart(barPart);
      panel.addPart(scaleX);
      panel.addPart(scaleY);
      BorderPart borderPart = new BorderPart(legend);
      panel.addPart(borderPart, c.reference(grid).anchorEast().targetWest().shiftX(10));
      panel.addPart(xAxis, c.referenceX(grid).anchorSouth().targetNorth().shiftY(5));
      panel.addPart(yAxis, c.referenceY(grid).anchorWest().targetEast().shiftX(-5));
      panel.addPart(title, c.anchorNorth().targetSouth().shiftY(-10));
      setContent(panel);
    }
  }
}
Let's have a quick look at the inner class BarChart first. As
you can see, this class extends the Chart
class and encapsulates the whole layout of a bar chart. It basically allocates a new bar
part, a new Cartesian grid, two scales (x and y), and three label parts (title and names
of axis). It then takes a panel part and adds all parts to it using suitable layout
constraints (see previous chapter). Finally it sets the content to the super class.
The data values for all these parts are provided by the ChartModel. This interface has the following definition:
public interface ChartModel {

  public int getRowCount();

  public int getColumnCount();

  public Object getValueAt(int rowIndex, int columnIndex);

  public String getTextAt(int rowIndex, int columnIndex);

  public String getTextForRow(int rowIndex);

  public String getTextForColumn(int columnIndex);

  public String getTextForKey(String key);

  public void addChartModelListener(ChartModelListener listener);

  public void removeChartModelListener(ChartModelListener listener);

}
It provides the data in the form of a matrix that has a certain number of
rows and columns. Each cell of the matrix has a value and a text. The value might be any
object, but is mostly an extension of the class java.lang.Number.
The text of a cell provides the formatted value of the cell and is used to label the chart values. Each row and each column has also a text that is used for the scale or the legend.
The title and other arbitrary text elements of the chart retrieve their
text also from the chart model. They use the method getTextForKey(String) as
their data source. In the previous example, the title label part uses the key
"title" to retrieve the data. There are no predefined values for the keys; the
programmer is free to choose his preferred naming for these keys.
Last but not least, chart model listeners can be added to the ChartModel. They get notified whenever a change in the chart model occurs.
Here is the code of the chart model that has been used in the previous example:
public class SimpleChartModel extends AbstractChartModel {
  private Map _texts = new HashMap();
  private int _rowCount;
  private int _columnCount;

  //// constructors

  public SimpleChartModel(int rowCount, int columnCount, String title, String x, String y) {
    this(rowCount, columnCount);
    setText("title", title);
    setText("x", x);
    setText("y", y);
  }

  public SimpleChartModel(int rowCount, int columnCount) {
    _rowCount = rowCount;
    _columnCount = columnCount;
  }

  //// interface ChartModel

  public int getRowCount() {
    return _rowCount;
  }

  public int getColumnCount() {
    return _columnCount;
  }

  public Object getValueAt(int rowIndex, int columnIndex) {
    return new Integer((1+rowIndex) * (1+columnIndex));
  }

  public String getTextForKey(String key) {
    return (String)_texts.get(key);
  }

  //// private methods

  private void setText(String key, String text) {
    _texts.put(key, text);
  }
}
The AbstractChartModel can be extended to define a custom chart model. It manages the list of listeners and offers a method to fire a model change event.
Important features of interactive charts are tool tip texts and
drilldowns. A tool tip text is a small popup control that appears when the mouse cursor
stays over a component. The drilldown mechanism at the other hand enables a user to click
into a chart component and open a more detailed view of the selected data. It must also be
possible to change the look of the mouse cursor if it is located over a drill down enabled
control.
More general, the programmer wants to know what data are currently under the mouse cursor.
He gets this information with a call to the method ChartPanel.getLogicalPoint(Point
p). With the returned information, the programmer is able to display the tool tip of
his choice or to implement a drilldown behavior. The following code shows the idea:
![]() ToolTipExample
ToolTipExample
First of all, create a chart panel as usual. Then install your tool tip handler with the chart panel and open the chart panel as usual:
  ...
  ChartPanel chartPanel = new ChartPanel(new BarChart(model));
  new MyTooltipHandler(chartPanel).install();
  FrameHelper.open(new JScrollPane(chartPanel));
  ...
And here comes one possible implementations of your tooltip handler:
  private class MyTooltipHandler extends MouseMotionAdapter {
    private ChartPanel _chartPanel;

    //// constructor

    public MyTooltipHandler(ChartPanel chartPanel) {
      _chartPanel = chartPanel;
    }

    //// public methods

    public void install() {
      ToolTipManager.sharedInstance().registerComponent(_chartPanel);
      _chartPanel.addMouseMotionListener(this);
    }

    public void uninstall() {
      ToolTipManager.sharedInstance().unregisterComponent(_chartPanel);
      _chartPanel.removeMouseMotionListener(this);
    }

    //// overridden methods

    public void mouseMoved(MouseEvent e) {
      LogicalPoint lp = _chartPanel.getLogicalPoint(e.getPoint());
      String text = null;
      if (lp != null) {
        ChartModel model = lp.getChartModel();
        if (model != null) {
          // use lp and model to calculate the tooltip text
          int col = lp.getColumnIndex();
          int row = lp.getRowIndex();
          if (row >= 0) {
            if (col >= 0) {
              text = model.getTextAt(row, col);
            }
            else {
              text = model.getTextForRow(row);
            }
          }
          else {
            if (col >= 0) {
              text = model.getTextForColumn(col);
            }
          }
        }
      }
      _chartPanel.setToolTipText(text);
    }
  }
The install method registers the chart panel with the tool tip manager and adds a mouse motion listener to the chart panel. The mouseMoved(MouseEvent) method is automatically called whenever the mouse moves over the component. A LogicalPoint is calculated upon each mouse move which gives detailed information about the underlying data structure (chart model, indices etc.). This information is used to construct the corresponding tool tip text. It can also be used to change the look of the mouse cursor or to implement a drilldown behavior.
The package li.netcat.chart.util contains - beside other
utilities - a collection of parts that can be used to build charts. See the package description for an
overview. The following diagram shows the class hierarchy of all parts in the collection.
Dashed boxes refer to abstract classes.
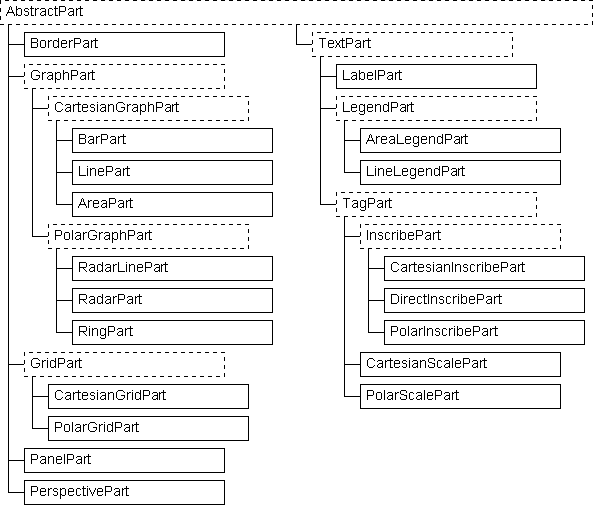
By convention, all implementations of the Part interface end with the term "Part". You are encouraged to use the same naming convention if you define your own parts. To define your own part, it is possible to extend an existing part from the collection so that you profit from the existing functionality.
The following example makes use of different parts from the collection:
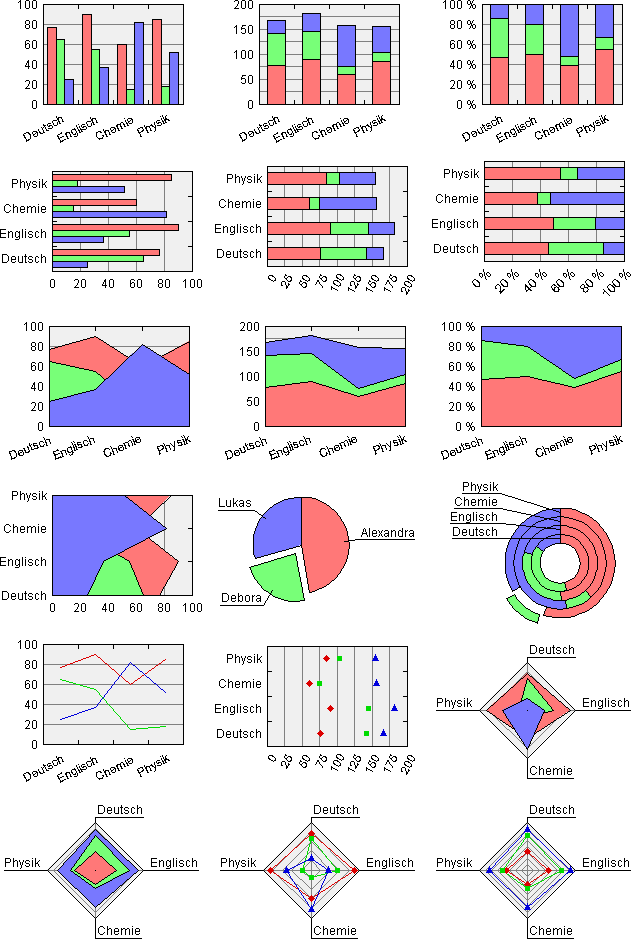
And here comes the code that produced these charts:
![]() CollectionExample
CollectionExample
public class CollectionExample {

  public static void main(String[] args) {
    FrameHelper.open(createCharts(), -1, 3);
  }

  public static Chart[] createCharts() {
    ChartModel model = new StudentsChartModel();
    return new Chart[] {
        new BarChart(model, ChartConstants.STACK_TYPE_NOT_STACKED, ChartConstants.HORIZONTAL),
        new BarChart(model, ChartConstants.STACK_TYPE_STACKED, ChartConstants.HORIZONTAL),
        new BarChart(model, ChartConstants.STACK_TYPE_STACKED_PERCENT, ChartConstants.HORIZONTAL),
        new BarChart(model, ChartConstants.STACK_TYPE_NOT_STACKED, ChartConstants.VERTICAL),
        new BarChart(model, ChartConstants.STACK_TYPE_STACKED, ChartConstants.VERTICAL),
        new BarChart(model, ChartConstants.STACK_TYPE_STACKED_PERCENT, ChartConstants.VERTICAL),
        new AreaChart(model, ChartConstants.STACK_TYPE_NOT_STACKED, ChartConstants.HORIZONTAL),
        new AreaChart(model, ChartConstants.STACK_TYPE_STACKED, ChartConstants.HORIZONTAL),
        new AreaChart(model, ChartConstants.STACK_TYPE_STACKED_PERCENT, ChartConstants.HORIZONTAL),
        new AreaChart(model, ChartConstants.STACK_TYPE_NOT_STACKED, ChartConstants.VERTICAL),
        new PieChart(model),
        new RingChart(model),
        new LineChart(model, ChartConstants.STACK_TYPE_NOT_STACKED, ChartConstants.HORIZONTAL, true, false),
        new LineChart(model, ChartConstants.STACK_TYPE_STACKED, ChartConstants.VERTICAL, false, true),
        new RadarChart(model, ChartConstants.STACK_TYPE_NOT_STACKED),
        new RadarChart(model, ChartConstants.STACK_TYPE_STACKED),
        new RadarLineChart(model, ChartConstants.STACK_TYPE_NOT_STACKED, true, true),
        new RadarLineChart(model, ChartConstants.STACK_TYPE_STACKED, true, true),
    };
  }


  public static class BarChart extends CartesianChart {
    public BarChart(ChartModel model, int type, int orientation) {
      super(new BarPart(model, type, orientation));
    }
  }

  public static class AreaChart extends CartesianChart {
    public AreaChart(ChartModel model, int type, int orientation) {
      super(new AreaPart(model, type, orientation));
    }
  }

  public static class LineChart extends CartesianChart {
    public LineChart(ChartModel model, int type, int orientation, boolean paintLines, boolean paintSymbols) {
      super(new LinePart(model, type, orientation, paintLines, paintSymbols));
    }
  }

  public static class RadarChart extends PolarChart {
    public RadarChart(ChartModel model, int type) {
      super(new RadarPart(model, type));
    }
  }

  public static class RadarLineChart extends PolarChart {
    public RadarLineChart(ChartModel model, int type, boolean paintLines, boolean paintSymbols) {
      super(new RadarLinePart(model, type, paintLines, paintSymbols));
    }
  }

  public static class PieChart extends Chart {
    public PieChart(ChartModel model) {
      RingPart ringPart = new RingPart(new SumRowsChartModel(model), ChartConstants.STACK_TYPE_STACKED_PERCENT);
      ringPart.setSize(48, 0);
      ringPart.setRadialMove(0, 1, 10.0f);
      PanelPart panel = new PanelPart();
      panel.addPart(ringPart);
      panel.addPart(new PolarInscribePart(ringPart));
      setContent(panel);
    }
  }

  public static class RingChart extends Chart {
    public RingChart(ChartModel model) {
      RingPart ringPart = new RingPart(model, ChartConstants.STACK_TYPE_STACKED_PERCENT);
      ringPart.setSize(35, 20);
      ringPart.setRadialMove(3, 1, 10.0f);
      CartesianScalePart cartesianScalePart = new CartesianScalePart(ringPart, ChartConstants.LEFT);
      cartesianScalePart.setAdditionalLineLength(ringPart.getRadius()+5);
      cartesianScalePart.setTagManager(new DefaultTagManager(DefaultTagManager.STYLE_UNDERLINE, DefaultTagManager.METHOD_MOVE));
      cartesianScalePart.setPen(Pen.getDefaultCapButt());
      PanelPart panel = new PanelPart();
      panel.addPart(ringPart);
      panel.addPart(cartesianScalePart);
      setContent(panel);
    }
  }

  public static class CartesianChart extends Chart {
    public CartesianChart(CartesianGraphPart cartesianGraphPart) {
      cartesianGraphPart.setSize(140, 100);
      CartesianGridPart cartesianGridPart = new CartesianGridPart(cartesianGraphPart);
      if (cartesianGraphPart.getOrientation() == CartesianGraphPart.VERTICAL) {
        cartesianGridPart.flipFlags();
      }
      PanelPart panel = new PanelPart();
      panel.addPart(cartesianGridPart);
      panel.addPart(cartesianGraphPart);
      panel.addPart(new CartesianScalePart(cartesianGraphPart, CartesianScalePart.LEFT));
      panel.addPart(new CartesianScalePart(cartesianGraphPart, CartesianScalePart.BOTTOM));
      setContent(panel);
    }
  }

  public static class PolarChart extends Chart {
    public PolarChart(PolarGraphPart polarGraphPart) {
      polarGraphPart.setSize(48, 0);
      PanelPart panel = new PanelPart();
      panel.addPart(new PolarGridPart(polarGraphPart));
      panel.addPart(polarGraphPart);
      panel.addPart(new PolarScalePart(polarGraphPart));
      setContent(panel);
    }
  }
}
The open method of the class FrameHelper wraps a ChartPanel around each chart and opens them
in a JFrame:
  public static void open(Chart[] charts, int rows, int cols) {
    JPanel panel = new JPanel(new GridLayout(rows, cols, 10, 10));
    panel.setBackground(Color.white);
    for (int i=0; i<charts.length; i++) {
      panel.add(new ChartPanel(charts[i]));
    }
    JFrame frame = new JFrame("ChartCat Example");
    frame.setContentPane(new JScrollPane(panel));
    frame.pack();
    frame.setVisible(true);
  }
The two classes CartesianChart and PolarChart have been added
to reduce the size of the code. In real life charts, a direct extension of the Chart
class would be more adequate. Feel free to define charts according to your needs.
As you can see, the Cartesian parts can have a vertical or horizontal orientation. Furthermore, all charts support stacked values and stacked values that are completed to 100%.
The implementation of a 3D effect is separated from the implementation of a Part. See the following example that shows, how you can add a 3D effect to an arbitrary part. The following code is the standard way to define a simple bar chart with a grid:
![]() PerspectiveExample
PerspectiveExample
public static class BarChart extends Chart {

  public BarChart(ChartModel chartModel) {
    BarPart barPart = new BarPart(chartModel);
    barPart.setSize(200, 150);
    CartesianGridPart grid = new CartesianGridPart(barPart);
    PanelPart panel = new PanelPart();
    panel.addPart(grid);
    panel.addPart(barPart);
    setContent(panel);
  }
}
To add a 3D effect, simply wrap a PerspectivePart around the panel as the following example shows:
public static class BarChart extends Chart {

  public BarChart(ChartModel chartModel) {
    BarPart barPart = new BarPart(chartModel);
    barPart.setSize(200, 150);
    CartesianGridPart grid = new CartesianGridPart(barPart);
    PanelPart panel = new PanelPart();
    panel.addPart(grid);
    panel.addPart(barPart);
    setContent(new PerspectivePart(panel));
  }
}
Use the properties of the PerspectivePart to change the vanishing point or the direction and brightness of the light source and use the GraphLook property of the BarPart to change the color and the outline of the data values:
public static class BarChart extends Chart {

  public BarChart(ChartModel chartModel) {
    BarPart barPart = new BarPart(chartModel);
    barPart.setSize(200, 150);
    barPart.getGraphLook().setAreaChartPens(Pen.createFillPens(120, 255));
    CartesianGridPart grid = new CartesianGridPart(barPart);
    PanelPart panel = new PanelPart();
    panel.addPart(grid);
    panel.addPart(barPart);
    PerspectivePart perspectivePart = new PerspectivePart(panel);
    perspectivePart.setVanishingPoint(20, -10);
    perspectivePart.setLight(50, 50);
    setContent(perspectivePart);
  }
}
The following code produces a 3D pie chart. Note the stretch property of the pie that makes an ellipse out of the circle. Another property worth mentioning is the flatness parameter. This is the maximum distance that the line segments used to approximate the curved segments are allowed. Smaller values produce better results at the cost of performance.
![]() PieChartExample3D
PieChartExample3D
public static class PieChart extends Chart {

  public PieChart(ChartModel chartModel) {
    RingPart pie = new RingPart(chartModel);
    PerspectivePart pp = new PerspectivePart(pie);
    pie.setSize(46, 0);
    pie.setStretch(3.0f);
    pie.setFlatness(0.01f);
    pie.getGraphLook().setAreaChartPens(Pen.createFillPens(90, 255));
    pp.setVanishingPoint(0, 30);
    pp.setLight(170, 40);
    setContent(pp);
  }
}

How does the PerspectivePart know, how to paint the elements of a part? Well, each element of a part has a perspective property that can be set to FOREGROUND, PERSPECTIVE or BACKGROUND. Let's try it:
public static class BarChart extends Chart {

  public BarChart(ChartModel chartModel) {
    BarPart barPart = new BarPart(chartModel);
    barPart.setSize(200, 150);
    barPart.getGraphLook().setAreaChartPens(Pen.createFillPens(120, 255));
    CartesianGridPart grid = new CartesianGridPart(barPart);
    grid.setHorizontalLinesPerspective(ChartConstants.PERSPECTIVE);
    PanelPart panel = new PanelPart();
    panel.addPart(barPart);
    panel.addPart(grid);
    PerspectivePart perspectivePart = new PerspectivePart(panel);
    perspectivePart.setVanishingPoint(20, -10);
    perspectivePart.setLight(50, 50);
    setContent(perspectivePart);
  }
}
The PerspectivePart even works together with the legend part as the following example shows:
public static class Legend extends Chart {

  public Legend(ChartModel model) {
    // in normal cases, this graph part is also added to the chart.
    BarPart dummy = new BarPart(model);

    AreaLegendPart areaLegend = new AreaLegendPart(dummy);
    areaLegend.setPerspective(ChartConstants.PERSPECTIVE);
    areaLegend.setItemTextGap(10);
    PerspectivePart persAreaLegend = new PerspectivePart(areaLegend);
    persAreaLegend.setVanishingPoint(4, -4);

    LineLegendPart lineLegend = new LineLegendPart(dummy);
    lineLegend.setPerspective(ChartConstants.PERSPECTIVE);
    lineLegend.setItemTextGap(8);
    PerspectivePart persLineLegend = new PerspectivePart(lineLegend);
    persLineLegend.setVanishingPoint(4, -4);
    persLineLegend.setLight(-10, 20);

    PanelPart panel = new PanelPart();
    PanelPartConstraints c = PanelPartConstraints.DEFAULT;
    panel.addPart(persAreaLegend);
    panel.addPart(persLineLegend, c.anchorSouthWest().targetNorthWest().shiftY(1));
    setContent(new BorderPart(panel));
  }
}
Since the implementation of the perspective is completely separated from the part, it is also possible to implement an other visual effect like a "ShadowPart" that can decorate all existing parts without any change! As you can see, there are plenty of possibilities to play with the look of a chart. Please see the images in the Overview document and the source code of the perspective example (included in the distribution) for more samples.
As you can see in the part hierarchy, there are two implementations for grids: The CartesianGridPart which is used "behind" CartesianGraphParts and the PolarGridPart which is used "behind" PolarGraphParts. The correct positioning of the grids behind the graphs is done automatically. Grids have may porperties and flags that define the apperance of the grid. For exampe, the number of displayed grid lines can be reduced using the methods
PolarGridPart.setRingInterval(int);
PolarGridPart.setSpokeInterval(int);
CartesianGridPart.setGridIntervalX(int);
CartesianGridPart.setGridIntervalY(int);
What about scales? There are two implementation of scales in the library: The CartesianScalePart is used as a horizontal and vertical scale in combination with a Cartesian graph or as a vertical scale in a polar graph. The PolarScalePart is used as a "round" scale for polar graphs. The positioning is also automatic but can be influenced by certain properties (additional line lenght, insets or layout constraints). The number of displayed marks can also be reduced using the methods
PolarScalePart.setMarkInterval(int);
CartesianScalePart.setMarkInterval(int);
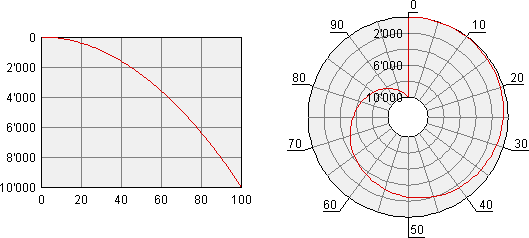
The following example shows the function y = x*x for the values x = 0..100. Note that the vertical scale is inverted and that the grid does not paint all lines for the value x. You will find the source code in the example package.
![]() GridIntervalExample
GridIntervalExample
There are different ways to change the look of a chart. As you know, the chart consists of one or more parts. All parts have a variety of properties that influence the look of the chart. One of the most important properties is the Pen. It basically has three properties:
a stroke that is used to stroke a line or the outline of a shape
an outline paint that is used to paint a line or the outline of a shape
a fill paint that is used to fill a shape, to draw text or to fill the lateral area of a line in a 3D view.
The pen and all of its properties can be null, which means "completely transparent".
A graph consists of a series of data and each data element probably gets painted with a different pen. The different pens for the data series are provided by the GraphLook class. This property defines the whole look of a graph, i.e. the pens for area charts and the pens and reference symbols for line charts. The following command changes the pens of the areas of a graph to a custom black/white texture:
![]() TextureExample
TextureExample
...
// create own graph look
GraphLook graphLook = new GraphLook();
graphLook.setAreaChartPens(createAreaChartPens());
// set new graph look to chart.
areaPart.setGraphLook(graphLook);
...
This command influences also the legend part, because the legend gets its graph look from the area part:
Sometimes, not only the graph itself needs its custom look, but also the scales and grids. This can simply be done by setting the relevant pen to the part:
grid.setBackgroundPen(myPen);
The default grid and scale implementations give you even the possibility to influence the color and shape of each single scale element, each grid line and each single background segment. This is done with the concept of a PenBox. The PenBox is a simple pen collection that provides different instances of pens:
grid.setBackgroundPenBox(myPenBox);
If the pen box is set to null, the default pen of this property is used, oterwise, the pen of the pen box is used. The following example shows the usage of pen boxes:
![]() PenBoxExample
PenBoxExample
public static class RadarLineChart extends Chart {

  public RadarLineChart(ChartModel chartModel) {

    // prepare radar line part
    RadarLinePart radarLinePart = new RadarLinePart(chartModel);
    radarLinePart.setSize(140f, 8f);
    radarLinePart.setPaintSymbols(false);
    // set a static scale model that starts at 10, has marks at 40, 60 and ends at 90
    radarLinePart.setRadialScaleModel(new StaticScaleModel(new double[]{10, 40, 60, 90}));
    // prepare a own graph look
    GraphLook look = new GraphLook();
    // define the pens that are used to paint the lines of the chart
    look.setLineChartPenBox(new MyLineChartPenBox());
    // set the look to the graph
    radarLinePart.setGraphLook(look);

    // prepare the grid
    PolarGridPart grid = new PolarGridPart(radarLinePart);
    // define different background colors
    grid.setBackgroundPenBox(new MyBackgroundPenBox());
    // define different pens for the ring lines
    grid.setRingPenBox(new MyRingPenBox());
    // define a pen box for the spokes and the polar scale
    PenBox scalePenBox = new MyScalePenBox();
    // paint the spokes with the scale pen box
    grid.setSpokePenBox(scalePenBox);

    // prepare a polar scale
    PolarScalePart polarScalePart = new PolarScalePart(radarLinePart);
    // paint the text with the scale pen box
    polarScalePart.setTextPenBox(scalePenBox);
    // paint the lineswith the scale pen box
    polarScalePart.setLinePenBox(scalePenBox);

    // add everyting to a panel
    PanelPart panel = new PanelPart();
    panel.addPart(grid);
    panel.addPart(radarLinePart);
    panel.addPart(polarScalePart);
    setContent(panel);
  }
}
The resulting chart looks like this:

Labeling charts is a troublesome story, especially the handling of
overlapping labels. ChartCat solves these problems with its "Tag Concept". It
uses the naming "tag" instead of the overloaded name "label". An own
package (li.netcat.chart.util.tag)
has been created that holds the interfaces and classes making up this concept. Scales as
well as inscriptions make use of the tag concept.
The default configurations are such that you usually don't have to bother about the correct layout of tags. The following example shows how to inscribe for example a pie chart:
![]() TagExample
TagExample
This chart is defined by the following class:
public static class PieChart extends Chart {

  public PieChart(ChartModel chartModel) {
    RingPart ringPart = new RingPart(chartModel);
    ringPart.setSize(50, 0);
    PanelPart panel = new PanelPart();
    panel.addPart(ringPart);
    panel.addPart(new PolarInscribePart(ringPart));
    setContent(panel);
  }
}
You just have to add a new PolarInscribePart to the chart. There is also a CartesianInscribePart for Cartesian charts and a DirectInscribePart for both types of charts available.
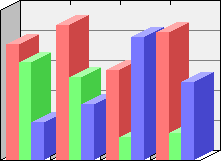
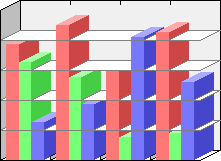
Now lets dig a little deeper into the tag concept and consider the following two bar charts:
The scale as well as the inscription can freely be configured in its layout. The following two classes define these two bar charts:
public static class BarChart extends Chart {

  public BarChart(ChartModel chartModel) {
    BarPart barPart = new BarPart(chartModel);
    barPart.setSize(100, 75);
    CartesianInscribePart inscribePart = new CartesianInscribePart(barPart);
    DefaultTagManager tagManager = new DefaultTagManager(DefaultTagManager.STYLE_TURN, DefaultTagManager.METHOD_MOVE);
    tagManager.setTurnTextLineGap(0);
    inscribePart.setTagManager(tagManager);
    inscribePart.setPosition(ChartConstants.TOP);
    inscribePart.setTargetPosition(1, -3, 0, 0);
    CartesianScalePart scaleX = new CartesianScalePart(barPart, ChartConstants.BOTTOM);
    scaleX.setTagManager(new DefaultTagManager(DefaultTagManager.STYLE_UNDERLINE, DefaultTagManager.METHOD_MOVE));
    CartesianScalePart scaleY = new CartesianScalePart(barPart, ChartConstants.LEFT);
    scaleY.setTagManager(new DefaultTagManager(DefaultTagManager.STYLE_DASH, DefaultTagManager.METHOD_MOVE));
    CartesianGridPart grid = new CartesianGridPart(barPart);
    grid.setPaintBorderFlags(false, false, false, false);
    grid.setPaintMarksFlags(false, false, false, false);
    grid.setBackgroundPaint(null);
    PanelPart panel = new PanelPart();
    panel.addPart(grid);
    panel.addPart(barPart);
    panel.addPart(inscribePart);
    panel.addPart(scaleX);
    panel.addPart(scaleY);
    setContent(panel);
  }
}

public static class BarChart2 extends Chart {

  public BarChart2(ChartModel chartModel) {
    BarPart barPart = new BarPart(chartModel);
    barPart.setSize(110, 75);
    DirectInscribePart inscribePart = new DirectInscribePart(barPart);
    BasicTagManager tagManager = new BasicTagManager(ChartConstants.LEFT, ChartConstants.CENTER, 90);
    inscribePart.setTagManager(tagManager);
    inscribePart.setTextLook(TextLook.getDefaultNormal());
    inscribePart.setTargetPosition(0, 5, 0, 0);
    CartesianScalePart scaleX = new CartesianScalePart(barPart, ChartConstants.BOTTOM);
    scaleX.setTagManager(new DefaultTagManager(DefaultTagManager.STYLE_TURN, DefaultTagManager.METHOD_MOVE));
    CartesianScalePart scaleY = new CartesianScalePart(barPart, ChartConstants.LEFT);
    scaleY.setTagManager(new DefaultTagManager(DefaultTagManager.STYLE_UNDERLINE, DefaultTagManager.METHOD_REMOVE));
    CartesianGridPart grid = new CartesianGridPart(barPart);
    grid.setPaintBorderFlags(false, false, false, false);
    grid.setPaintMarksFlags(false, false, false, false);
    grid.setBackgroundPaint(null);
    PanelPart panel = new PanelPart();
    panel.addPart(grid);
    panel.addPart(barPart);
    panel.addPart(inscribePart);
    panel.addPart(scaleX);
    panel.addPart(scaleY);
    setContent(panel);
  }
}
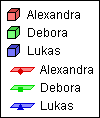
The blue code parts correspond to the labels at the top of the first chart or to the direct labels in the bars respectively. The green and yellow parts configure the x and y scale.
As you can see in the class hierarchy, scale parts and inscribe parts are all extensions of the TagPart. The tag part itself uses a TagManager that is responsible for the final layout of the tags. The default tag manager implementations that come along with ReportCat offer already a lot of possible strategies to do the layout of tags.
Since ChartCat is independent of the output device, charts can easily be printed using the standard java print API. Let's have a quick look at the API of a Chart. It contains among others two straight forward methods that are used to paint the chart:
public Dimension getSize(Graphics g);

public void paint(Graphics g, int x, int y);
These two slim methods guarantee an easy integration of ChartCat charts
into any graphic environment. Nevertheless, printing is a complex process, since the java
print API provides just more or less an instance of a Graphics object that
can be used to paint on each page.
Fortunately the technology company NetCat AG provides a product called "Java Report Printing Library (ReportCat)" that makes layouting and printing of complex reports quiet easy. As the following example shows, ChartCat and ReportCat work together in a perfect harmony.
![]() PrintExample
PrintExample
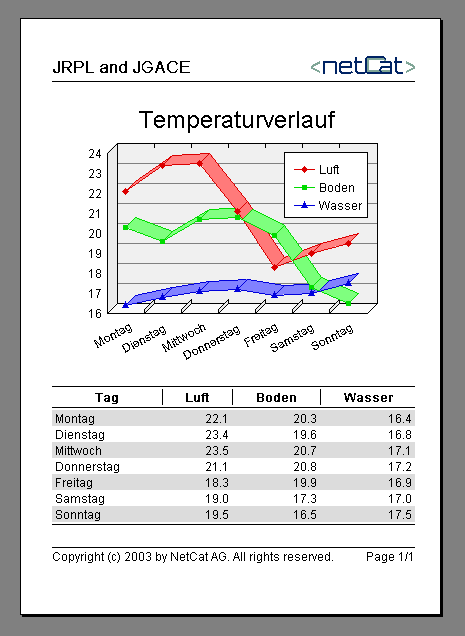
To run this example, you will need at least the free trial version of ReportCat. Here is the code that produced this report:
public class PrintExample {

  public static void main(String[] args) {
    new PrintPreview(new PagePrint(createPrint(), new MyPageDecorator())).open();
  }

  public static Print createPrint() {
    ChartModel chartModel = new TemperatureChartModel();
    TableDataModel tableModel = new ChartModelTableDataModelAdapter(chartModel);
    TablePrint table = new TablePrint(tableModel);
    table.setFitWidth(true);
    table.setCellDrawer(Number.class, table.createDefaultCellDrawer(PrintConstants.RIGHT));
    ChartPrint chart = new ChartPrint(new LineChart(chartModel));
    GridPrint gridPrint = new GridPrint(20, 20);
    GridPrintConstraints c = GridPrintConstraints.DEFAULT.hAlignCenter();
    gridPrint.add(chart, c);
    gridPrint.add(table, c);
    return gridPrint;
  }
}
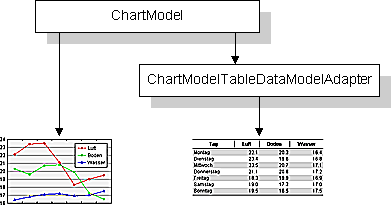
Let's consider the interesting (bold) parts of this code. The TemperatureChartModel
is an implementation of a ChartModel that provides the temperature data. Its
implementation may get the data from a database or from any other source. To be honest,
this data model uses hard coded values for the sake of simplicity. The point is that the
table model is derived from the chart model by using the following adapter:
public class ChartModelTableDataModelAdapter implements TableDataModel {
  private ChartModel _chartModel;

  //// constructors

  public ChartModelTableDataModelAdapter(ChartModel chartModel) {
    _chartModel = chartModel;
  }

  public int getRowCount() {
    return _chartModel.getRowCount();
  }

  public int getColumnCount() {
    return _chartModel.getColumnCount() + 1;
  }

  public Object getValueAt(int rowIndex, int columnIndex) {
    if (columnIndex == 0) {
      return _chartModel.getTextForRow(rowIndex);
    }
    return _chartModel.getTextAt(rowIndex, columnIndex-1);
  }

  public Object getValueTypeAt(int rowIndex, int columnIndex) {
    if (columnIndex == 0) {
      return String.class;
    }
    return Number.class;
  }

  public boolean hasHeader() {
    return true;
  }

  public Object getHeaderAt(int columnIndex) {
    if (columnIndex == 0) {
      return "Tag";
    }
    return _chartModel.getTextForColumn(columnIndex-1);
  }

  public Object getHeaderTypeAt(int columnIndex) {
    return String.class;
  }

  public boolean hasFooter() {
    return false;
  }

  public Object getFooterAt(int columnIndex) {
    return null;
  }

  public Object getFooterTypeAt(int columnIndex) {
    return null;
  }
}
This class adapts the chart model to a data model. It uses the column names of the chart model as titles of the table and includes the names of the rows as the first column:
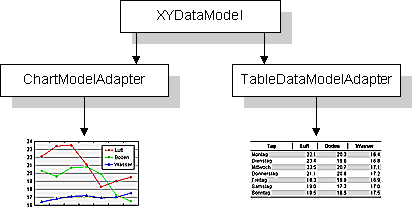
It is also possible to derive the chart model from the table model. However, in real life applications, the data values are probably available in a third, project specific form. Using two adapters would be a good solution:
Now, lets have a look how the chart itself gets integrated into the
report. ReportCat uses "prints" as building blocks for its reports. It is
obvious to use an adapter that converts a part into a print. And this is exactly what the
class ChartPrint does:
import java.awt.*;
import li.netcat.chart.*;
import li.netcat.print.*;
import li.netcat.print.util.*;

public class ChartPrint extends PainterPrint {
  private Chart _chart;

  public ChartPrint(Chart chart) {
    super(new ChartPainter(chart));
  }

  public static class ChartPainter implements Painter {
    private Chart _chart;

    public ChartPainter(Chart chart) {
      _chart = chart;
    }

    public Dimension getSize(Graphics g) {
      return _chart.getSize(g);
    }

    public void paint(Graphics g, int x, int y) {
      _chart.paint(g, x, y);
    }
  }
}
This small adapter is the only necessary bridge between ChartCat and ReportCat. Since ChartCat is completely independent of ReportCat and vice versa, this adapter can not be part of any of both products. It must be integrated into the project code.
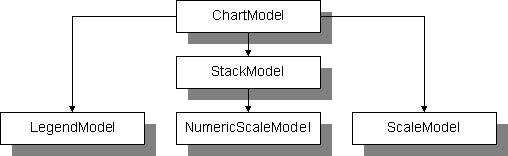
The data for a scale is provided by the ScaleModel. Each scale model has a length and a number of marks. The length of the scale is equal to its size on the screen. Each mark has a position in the scale, a text and a value. The scale model is also able to calculate the position of an arbitrary value. A scale with discrete, non numeric values like "Monday", "Tuesday", ... ,"Sunday" is free to use values like 0, 1, ..., 6 as numeric representatives.
The NumericScaleModel is an extension of the ScaleModel and uses real numeric values that can be absolute or in percent. It is possible to set a numeric range to this type of scale model. After construction, the numeric scale model is initialized with an instance of DefaultScaleModel.
Another player in the concept is the StackModel. It is used to calculate the values of a stacked chart and provides the rounded minimum and maximum values for the numeric scale. Without this functionality, the scale of a chart would end for example at 23.35 instead of 25.
Each GraphPart has a ChartModel, a LegenModel, a StackModel, a ScaleModel, and a NumericScaleModel. The data flows as shown in the following diagram:
All of these five models can be configured or replaced after the construction of a GraphPart. For example, if you want another subdivision of the numeric scale, just reconfigure the DefaultScaleModel, e.g.:
((DefaultScaleModel)myGraphPart.getNumericScaleModel()).setDivideMap(myDivideMap);
Note that the DefaultScaleModel can also be reverted, so that the smallest number is at the top of a horizontal scale. If you want a logarithmic or any other numeric subdivision, replace the whole numeric scale model with your own implementation, and all tool tips, graphs, grids and scales will display correctly:
myGraphPart.setNumericScaleModel(myComplexScaleModel);
The following example shows how to export a Chart to an image file. Note that this example only runs with Java 1.4 or later because of the png export functionality. The chart gets painted into a buffered image and then exported to a file:
![]() ImageExportExample
ImageExportExample
  public static void main(String[] args) {
    Chart myChart = new BarChart(new MyChartModel());
    // calculate the size of the chart (that depends on the graphics object)
    BufferedImage probe = new BufferedImage(1, 1, BufferedImage.TYPE_INT_ARGB);
    Graphics2D g2 = probe.createGraphics();
    Dimension size = myChart.getSize(g2);
    g2.dispose();
    // create the image with the right size. This example uses a transparent image.
    BufferedImage image = new BufferedImage(size.width, size.height, BufferedImage.TYPE_INT_ARGB);
    g2 = image.createGraphics();
    // fill the background with white (only necessary if the image is opaque)
    // g2.setColor(Color.white);
    // g2.fillRect(0, 0, image.getWidth(), image.getHeight());

    // paint the chart to the graphics
    myChart.paint(g2, 0, 0);
    g2.dispose();
    // print available image formats for debug purposes
    System.out.println("Available formats: " + Arrays.asList(ImageIO.getWriterFormatNames()));
    // write the image as a png to a file
    String fileName = "c:\\myimage.png";
    File f = new File(fileName);
    try {
      ImageIO.write(image, "png", f);
      System.out.println("File saved to "+fileName);
    }
    catch (IOException x) {
      x.printStackTrace();
    }
  }
Let's dig a little deeper into the elements of a chart. Sometimes, it's needed to iterate over all elements of a chart, for example to generate an image map. This can be done using the ElementIterator. This interface works much like the normal iterator concept. It provides methods to check, if there are more elements available. If yes, you can call a method to switch to the next element, if no, the iterator is exhausted and can only be thrown away.
How do I get an ElementIterator? Its provided by the IteratableLayout interface, which is an extension of the Layout interface. So, you have to check if the Layout is also an IteratableLayout and cast it down. In fact, all provided implementations Layout also implement the IteratableLayout interface.
Once you positioned the ElementIterator at a valid element you get access to the current translation of the element and access to the Element itself. The Element again provides methods about the bounds and the corresponding data model. If this information is not sufficient, it is possible to cast the Element down to the concrete implementation. This can be for example an AreaElement or a TextElement which provide information about the shape of the area or the text itself.
OK, this was a lot of theory, let's speak in Java language: The following example creates a small bar chart and iterates over all elements of the chat in detail:
![]() ElementIteratorExample
ElementIteratorExample
  public static void main(String[] args) {
    Chart myChart = new BarChart(new MyChartModel());
    // size depends on graphics, create a buffered image as probe
    BufferedImage probe = new BufferedImage(1, 1, BufferedImage.TYPE_INT_ARGB);
    Graphics2D g2 = probe.createGraphics();
    Layout layout = myChart.getContent().getLayout(g2);
    g2.dispose();
    if (layout instanceof IteratableLayout) {
      // downcast to IteratableLayout
      IteratableLayout itLayout = (IteratableLayout)layout;
      Rectangle2D.Float bounds = new Rectangle2D.Float();
      AffineTransform tr = new AffineTransform();
      float[] coords = new float[6];
      // iterate over all elements
      for (ElementIterator it = itLayout.getElements(); !it.isDone(); it.next()) {
        Element currentElement = it.currentElement();
        LogicalPoint lp = currentElement.getLogicalPoint();
        if (lp != null) {
          // current element represents some data of the model!
          float tx = it.currentTranslateX();
          float ty = it.currentTranslateY();
          currentElement.getBounds(bounds);
          bounds.x += tx; // move bounds to translation
          bounds.y += ty;
          System.out.print("Row "+lp.getRowIndex()+ ", column "+lp.getColumnIndex()+" covers bounds ");
          System.out.println("["+bounds.x+", "+bounds.y+", "+bounds.width+", "+bounds.height+"] ");
          // get more details
          if (currentElement instanceof AreaElement) {
            Shape shape = ((AreaElement)currentElement).getArea();
            tr.setToTranslation(tx, ty);
            System.out.println("  Details:");
            // get a flat pathiterator that only returns lines, and iterate over the shape
            for (PathIterator pIt = shape.getPathIterator(tr, 2.0); !pIt.isDone(); pIt.next()) {
              int segment = pIt.currentSegment(coords);
              if (segment == PathIterator.SEG_MOVETO) {
                System.out.println("    MoveTo ["+coords[0]+", "+coords[1]+"], ");
              }
              else if (segment == PathIterator.SEG_LINETO) {
                System.out.println("    LineTo ["+coords[0]+", "+coords[1]+"], ");
              }
              else if (segment == PathIterator.SEG_CLOSE) {
                System.out.println("    Close.");
              }
            }
          }
        }
      }
    }
  }
This example produces the following output:
Row -1, column -1 covers bounds [-0.25, -175.25, 300.5, 175.5]
  Details:
    MoveTo [0.0, -175.0],
    LineTo [300.0, -175.0],
    LineTo [300.0, 0.0],
    LineTo [0.0, 0.0],
    LineTo [0.0, -175.0],
    Close.
Row 0, column 0 covers bounds [24.75, -44.0, 50.5, 44.25]
  Details:
    MoveTo [25.0, -43.75],
    LineTo [75.0, -43.75],
    LineTo [75.0, 0.0],
    LineTo [25.0, 0.0],
    Close.
Row 0, column 1 covers bounds [74.75, -87.75, 50.5, 88.0]
  Details:
    MoveTo [75.0, -87.5],
    LineTo [125.0, -87.5],
    LineTo [125.0, 0.0],
    LineTo [75.0, 0.0],
    Close.
Row 1, column 0 covers bounds [174.75, -87.75, 50.5, 88.0]
  Details:
    MoveTo [175.0, -87.5],
    LineTo [225.0, -87.5],
    LineTo [225.0, 0.0],
    LineTo [175.0, 0.0],
    Close.
Row 1, column 1 covers bounds [224.75, -175.25, 50.5, 175.5]
  Details:
    MoveTo [225.0, -175.0],
    LineTo [275.0, -175.0],
    LineTo [275.0, 0.0],
    LineTo [225.0, 0.0],
    Close.
Note that the coordinate 0, 0 is in the lower left corner of the chart.
Copyright © 2005 NetCat AG. All rights reserved. Feedback